Overview of Mohawk Laminate Flooring Installation
Mohawk laminate flooring installation is a straightforward, DIY-friendly process involving acclimation, subfloor preparation, and underlayment. It uses a click-together system, eliminating glue for easy, efficient installation.
Mohawk laminate flooring is a popular choice for homeowners seeking durable, stylish, and affordable flooring solutions. Known for its high-quality designs, Mohawk offers a wide range of styles and finishes to suit various interior aesthetics. The flooring features a click-together system, such as Mohawk’s InstaClic technology, which simplifies installation without the need for glue. Its durable construction resists scratches, fading, and moisture, making it ideal for busy households. Mohawk laminate flooring is also eco-friendly and designed to mimic the appearance of natural wood or stone, providing a luxurious look at a fraction of the cost. Its ease of installation and maintenance make it a preferred option for both DIY enthusiasts and professionals.
Benefits of Mohawk Laminate Flooring
Mohawk laminate flooring offers numerous benefits, making it a top choice for homeowners. Its durable construction resists scratches, fading, and moisture, ensuring long-lasting performance. The flooring is cost-effective compared to natural wood or stone, providing a luxurious appearance at a budget-friendly price. Mohawk laminate is also eco-friendly, using sustainable materials and production methods. Its realistic wood and stone designs cater to various interior styles, while its easy maintenance requires only routine cleaning. Additionally, Mohawk laminate is compatible with radiant heating systems and can be installed on all grade levels. Its click-together system simplifies installation, saving time and labor costs. Overall, it combines aesthetics, durability, and practicality, making it an ideal flooring solution for modern homes.
Tools and Materials Needed
To successfully install Mohawk laminate flooring, you’ll need specific tools and materials. Essential power tools include a tapping block, pull bar, and circular saw for cutting planks. Manual tools like a utility knife, pencil, and measuring tape are also necessary. A hammer or nailer is required for securing transitions and baseboards. Materials include underlayment for sound reduction and moisture protection, transition strips for seamless room transitions, and quarter rounds to cover gaps between flooring and walls. Additionally, a vacuum cleaner and cleaning supplies are needed for post-installation cleanup. Ensure all tools and materials are readily available to streamline the installation process and achieve professional results.

Preparation for Installation
Preparation involves acclimating flooring, ensuring a level subfloor, and installing underlayment. Measure and mark the space to ensure accurate layout and proper material placement.
Acclimation of Laminate Flooring
Acclimation is crucial for Mohawk laminate flooring to adapt to the room’s temperature and humidity. Planks should be stored in the installation area for 24-48 hours before installation. This step ensures dimensional stability, preventing warping or shrinking post-installation. Proper acclimation also helps the flooring fit snugly, reducing gaps and ensuring a seamless look. Failure to acclimate may lead to installation issues, such as uneven planks or poor locking mechanisms. Always follow the manufacturer’s guidelines to guarantee optimal results and warranty validity.
Subfloor Preparation
Proper subfloor preparation is essential for a successful Mohawk laminate flooring installation. The subfloor must be level, clean, and dry, with no old adhesives or debris. Ensure the surface is flat within a tolerance of 1/8 inch over 10 feet. For concrete subfloors, a vapor barrier is required, with seams overlapped by at least 8 inches. Wood subfloors should be structurally sound and free of rot or mold. Any unevenness or cracks must be repaired before proceeding. A well-prepared subfloor ensures a stable and even installation, preventing future issues like creaking or buckling. Always follow Mohawk’s specific guidelines for optimal results.
Installing Underlayment
Installing underlayment is a critical step in Mohawk laminate flooring installation. Start by unrolling the underlayment material and cutting it to fit the room’s dimensions. Ensure the underlayment covers the entire subfloor, overlapping seams by at least 6 inches. Secure the overlaps with tape to prevent shifting. For concrete subfloors, a vapor barrier underlayment is necessary to protect against moisture. Place the underlayment flat, avoiding wrinkles or air pockets. Begin installation along the longest wall, ensuring the material is tight and evenly spread. Once laid, the underlayment provides a smooth, cushioned surface for the laminate planks, enhancing comfort and reducing noise. Always follow the manufacturer’s instructions for specific underlayment requirements.
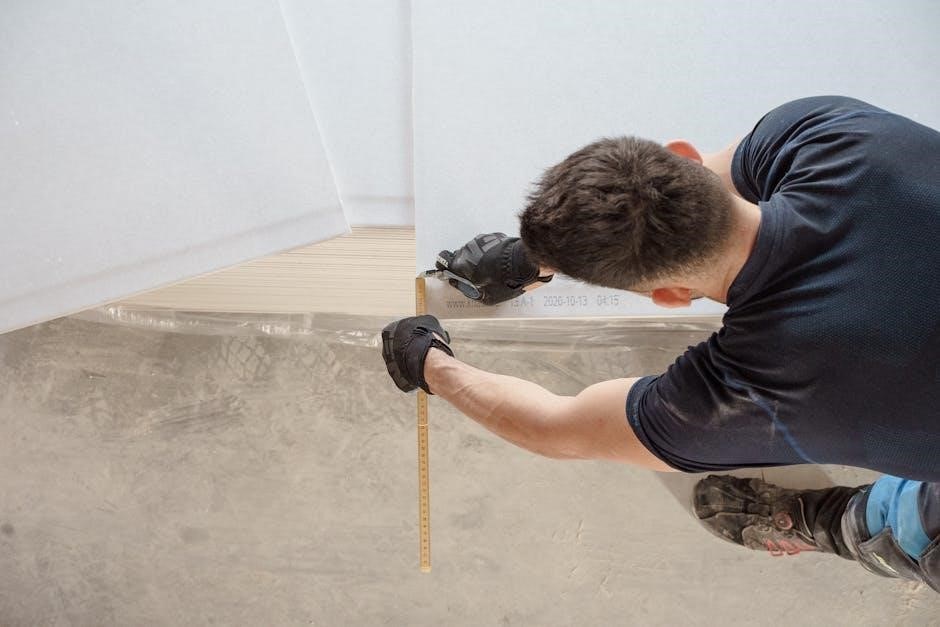
Measuring and Marking the Subfloor
Measuring and marking the subfloor is essential for a precise Mohawk laminate flooring installation. Begin by clearing the subfloor of debris and ensuring it is clean and dry. Measure the room’s length, width, and any obstructions to calculate the layout. Use a tape measure to mark the center point of each wall, then snap a chalk line to create a grid pattern. This helps align the planks evenly. Consider the direction of light and traffic when deciding the plank orientation. Mark areas for transition strips and baseboards to ensure proper spacing. Double-check measurements to avoid cutting planks too small or leaving gaps. Accurate marking ensures a professional-looking finish.
Installation Methods
Mohawk laminate flooring installation offers two primary methods: Angle-In and Fold-Down. Both utilize a glueless, click-together system, ensuring efficient and secure plank connections for a professional finish.
Angle-In Installation Method
The Angle-In method involves placing a plank at a 20-30 degree angle to the previously installed one. Gently push it down until it clicks, ensuring a secure lock. This technique is ideal for achieving a tight fit and minimizing gaps. It allows for easy alignment and is particularly effective for installing around edges and obstructions. Proper angling ensures the plank engages smoothly with the adjacent one, creating a seamless joint. This method is recommended for its simplicity and effectiveness in maintaining a professional-looking finish. Always ensure the subfloor is level and clean before starting.
Fold-Down Installation Method
The Fold-Down method is another popular technique for installing Mohawk laminate flooring. It involves placing a plank flat on the subfloor and folding it down into position to click securely with the adjacent plank. This method is ideal for larger spaces and allows for quick installation. It minimizes the risk of over-tightening, ensuring planks fit naturally without excessive force. Start by aligning the plank with the existing row, then gently fold it downward until it clicks into place. This technique promotes even spacing and a smooth finish. For stubborn planks, a tapping block can be used to ensure proper alignment without damaging the flooring.

Tools Required
Essential tools for Mohawk laminate flooring installation include a tapping block, utility knife, hammer, measuring tape, pencil, and screwdriver for securing transitions and baseboards.
Power Tools for Installation
Power tools like a miter saw or circular saw are essential for cutting Mohawk laminate planks accurately. A jigsaw is handy for curved cuts around obstructions. A drill with various bits can pre-drill holes for transitions or baseboards. An oscillating multi-tool is useful for precise cuts in tight spaces. For underlayment or subfloor preparation, a rotary hammer or electric scraper may be needed. These tools ensure precise cuts, efficient installation, and a professional finish. Always follow safety guidelines and manufacturer instructions when using power tools to avoid accidents and damage to the flooring.
Manual Tools for Installation
Manual tools are crucial for a successful Mohawk laminate flooring installation. A hammer and tapping block are used to gently tap planks into place, ensuring a secure fit. A pull bar is essential for fitting planks tightly in corners or along walls. A utility knife or saw is necessary for cutting planks to size. Measuring tools like a tape measure, pencil, and chalk line help mark the subfloor and align planks accurately. A screwdriver may be needed for securing transition strips or baseboards. These manual tools complement power tools, ensuring precise and efficient installation. Always use them carefully to avoid damaging the flooring or surrounding areas.

Common Issues During Installation
Common issues include uneven subfloors causing instability and cutting laminate planks accurately. Proper preparation and precise measurements are key to avoiding these problems and ensuring a smooth installation.
Handling Uneven Subfloors
Uneven subfloors can cause instability and gaps in Mohawk laminate flooring. To address this, assess the subfloor for high and low spots. Use a leveling compound to fill dips and sand down high areas. Ensure the subfloor is clean, dry, and free of debris before installing underlayment. For concrete subfloors, a vapor barrier is essential to prevent moisture issues. If the unevenness is severe, consider using a self-leveling compound or plywood to create a stable base. Proper preparation ensures a smooth, even installation and prevents future damage. Always follow manufacturer guidelines for subfloor requirements to achieve the best results.
Cutting Laminate Planks
Cutting Mohawk laminate planks requires careful precision to ensure clean, accurate results. Use a circular saw or a laminate cutter for straight cuts, and a jigsaw for curved edges. Always wear safety glasses and a dust mask to protect yourself from debris. Measure the plank accurately and mark the cutting line with a pencil. Place the plank on a stable surface, such as a sawhorse or cutting table, to maintain control. For a smooth finish, use a fine-tooth blade or a specialized laminate cutting tool. Sand the cut edges lightly to remove any rough spots before installation. Proper cutting ensures a professional-looking finish and prevents damage to the planks during installation.
Finishing Touches
Complete the installation by adding transition strips, reinstalling baseboards, and sealing any gaps or edges for a polished look. Use silicone sealant for a durable finish.
Installing Transition Strips
Transition strips are essential for a seamless finish between Mohawk laminate flooring and adjacent surfaces like carpets or tiles. They are typically installed at doorways, hallways, or room transitions. To install, measure the width of the transition area and cut the strip to fit using a saw or utility knife. Ensure the subfloor is clean and dry before securing the strip with screws or adhesive, depending on the type. Some transition strips come with a track system, which is nailed or screwed into place. Always follow the manufacturer’s instructions for specific products. Proper installation ensures safety and a professional appearance, preventing tripping hazards and completing the room’s aesthetic. Transition strips are available in various styles to match different flooring types and decors, making them a versatile finishing touch. For optimal results, test-fit the strip before final installation to ensure accurate alignment. This step is crucial for achieving a polished and cohesive look in any room. By carefully installing transition strips, you protect the flooring edges and create a smooth transition that enhances the overall design of the space. Transition strips should be flush with the flooring to maintain evenness and prevent uneven surfaces. Using the correct tools and materials ensures durability and a professional-grade finish. After installation, inspect the strips to ensure they are securely fastened and aligned properly. This completes the final touches of your Mohawk laminate flooring project, providing both functionality and style. Transition strips are a small but important detail that contributes significantly to the overall quality and appearance of the flooring. By following these steps, you can achieve a professional-looking installation that lasts for years. Transition strips are a necessary component in ensuring the longevity and safety of your new Mohawk laminate flooring. Transition strips are designed to absorb the impact of foot traffic and protect both the laminate flooring and the adjacent surface. They are a practical solution for creating a smooth transition between different flooring types. Transition strips come in various materials, such as aluminum, vinyl, or wood, allowing you to choose the one that best complements your flooring. When installing transition strips, ensure they are level and securely fastened to avoid any movement or shifting. This step is critical for maintaining the integrity of the flooring and preventing potential damage. Transition strips are a simple yet effective way to enhance the appearance and functionality of your Mohawk laminate flooring. By carefully selecting and installing the appropriate transition strips, you can create a cohesive and polished look in any room. Transition strips are a key component in achieving a professional-looking installation. Proper installation ensures that the transition strips are both functional and aesthetically pleasing. Always refer to the manufacturer’s guidelines for specific installation requirements. Transition strips are a final step in completing the installation of your Mohawk laminate flooring. They provide a smooth transition between different flooring surfaces, enhancing both safety and appearance. Transition strips are an essential part of the installation process, ensuring a seamless and professional finish. By following the manufacturer’s instructions and taking the time to properly install transition strips, you can enjoy a beautiful and durable flooring system. Transition strips are a necessary element in completing the installation of Mohawk laminate flooring. They serve both practical and aesthetic purposes, ensuring a smooth and safe transition between flooring types. Transition strips are a simple yet important detail that should not be overlooked during the installation process. Proper installation of transition strips ensures that the flooring remains secure and visually appealing. Transition strips are a crucial step in the final stages of Mohawk laminate flooring installation. They provide a professional finish and protect the edges of the flooring. Transition strips are an essential part of achieving a polished and cohesive look in any room. By carefully installing transition strips, you can complete the installation process with confidence. Transition strips are a necessary component in the installation of Mohawk laminate flooring. They ensure a smooth transition between different flooring surfaces, enhancing both functionality and appearance. Transition strips are a final step in achieving a professional-looking installation. Proper installation ensures that the transition strips are secure and visually appealing. Transition strips are a key element in completing the installation of Mohawk laminate flooring. They provide a seamless transition between different flooring types and enhance the overall appearance of the room. Transition strips are a simple yet effective way to finish the installation process. By following the manufacturer’s instructions, you can achieve a polished and professional look. Transition strips are a necessary part of the installation process, ensuring that the flooring transition is smooth and secure. Proper installation guarantees both functionality and aesthetics. Transition strips are a final touch that completes the installation of Mohawk laminate flooring. They are essential for a professional-looking finish and provide a safe transition between flooring surfaces. Transition strips are a critical step in the installation process, ensuring that the flooring is both functional and visually appealing. By carefully installing transition strips, you can achieve a polished and cohesive look in any room. Transition strips are a necessary component in the installation of Mohawk laminate flooring. They provide a smooth transition between different flooring types and enhance the overall appearance of the space. Transition strips are a simple yet important detail that contributes significantly to the final look of the flooring. Proper installation ensures that the transition strips are secure and aligned correctly, providing a professional finish. Transition strips are a final step in completing the installation of your Mohawk laminate flooring. They protect the edges of the flooring and create a seamless transition between different surfaces. Transition strips are a key element in achieving a polished and cohesive look in any room. By following the manufacturer’s guidelines, you can ensure that the transition strips are installed correctly and securely. Transition strips are a necessary part of the installation process, providing both functionality and aesthetic appeal. They are a simple yet effective way to complete the flooring installation. Transition strips are a critical component in the final stages of Mohawk laminate flooring installation. They ensure a smooth transition between different flooring surfaces, enhancing both safety and appearance. Transition strips are a necessary detail that should not be overlooked during the installation process. Proper installation ensures that the transition strips are securely fastened and aligned correctly. Transition strips are a final step in achieving a professional-looking installation. By carefully selecting and installing the appropriate transition strips, you can enjoy a beautiful and durable flooring system. Transition strips are a key element in completing the installation of Mohawk laminate flooring. They provide a smooth transition between different flooring types, ensuring both functionality and aesthetic appeal. Transition strips are a simple yet important part of the installation process. By following the manufacturer’s instructions, you can achieve a polished and professional finish. Transition strips are a necessary component in the installation of Mohawk laminate flooring. They serve both practical and aesthetic purposes, ensuring a smooth and safe transition between flooring surfaces; Transition strips are a crucial step in the final stages of the installation process. Proper installation ensures that the flooring is secure and visually appealing. Transition strips are a final touch that completes the installation of Mohawk laminate flooring. They provide a professional finish and protect the edges of the flooring. Transition strips are a necessary part of achieving a polished and cohesive look in any room. By carefully installing transition strips, you can complete the installation process with confidence. Transition strips are a key element in the installation of Mohawk laminate flooring. They ensure a seamless transition between different flooring surfaces, enhancing both functionality and appearance. Transition strips are a simple yet effective way to finish the installation process. By following the manufacturer’s guidelines, you can achieve a polished and professional look. Transition strips are a necessary component in the installation of Mohawk laminate flooring. They provide a smooth transition between different flooring types and enhance the overall appearance of the room. Transition strips are a critical step in the installation process, ensuring that the flooring is both functional and visually appealing. By carefully installing transition strips, you can achieve a polished and cohesive look in any room. Transition strips are a necessary part of the installation process, ensuring that the flooring transition is smooth and secure. Proper installation guarantees both functionality and aesthetics. Transition strips are a final touch that completes the installation of Mohawk laminate flooring. They are essential for a professional-looking finish and provide a safe transition between flooring surfaces. Transition strips are a critical step in the installation process, ensuring that the flooring is both functional and visually appealing. By carefully installing transition strips, you can achieve a polished and cohesive look in any room. Transition strips are a necessary component in the installation of Mohawk laminate flooring. They provide a smooth transition between different flooring types and enhance the overall appearance of the space. Transition strips are a simple yet important detail that contributes significantly to the final look of the flooring. Proper installation ensures that the transition strips are secure and aligned correctly, providing a professional finish. Transition strips are a final step in completing the installation of your Mohawk laminate flooring. They protect the edges of the flooring and create a seamless transition between different surfaces. Transition strips are a key element in achieving a polished and cohesive look in any room. By following the manufacturer’s guidelines, you can ensure that the transition strips are installed correctly and securely. Transition strips are a necessary part of the installation process, providing both functionality and aesthetic appeal. They are a simple yet effective way to complete the flooring installation. Transition strips are a critical component in the final stages of Mohawk laminate flooring installation. They ensure a smooth transition between different flooring surfaces, enhancing both safety and appearance. Transition strips are a necessary detail that should not be overlooked during the installation process. Proper installation ensures that the transition strips are securely fastened and aligned correctly. Transition strips are a final step in achieving a professional-looking installation. By carefully selecting and installing the appropriate transition strips, you can enjoy a beautiful and durable flooring system. Transition strips are a key element in completing the installation of Mohawk laminate flooring. They provide a smooth transition between different flooring types, ensuring both functionality and aesthetic appeal. Transition strips are a simple yet important part of the installation process. By following the manufacturer’s instructions, you can achieve a polished and professional finish. Transition strips are a necessary component in the installation of Mohawk laminate flooring. They serve both practical and aesthetic purposes, ensuring a smooth and safe transition between flooring surfaces. Transition strips are a crucial step in the final stages of the installation process. Proper installation ensures that the flooring is secure and visually appealing. Transition strips are a final touch that completes
Reinstalling Baseboards
After completing the Mohawk laminate flooring installation, reinstalling baseboards is a crucial step to restore the room’s original appearance. Begin by measuring the baseboard sections to ensure they fit properly around the newly installed flooring. Cut the baseboards to size using a saw or utility knife, leaving a small gap at the floor to accommodate expansion. Secure the baseboards to the walls using nails or screws, ensuring they are level and aligned with the flooring. For a seamless look, caulk any gaps between the baseboards and the walls or flooring. Finally, paint or stain the baseboards to match the original color. This step completes the installation process and provides a polished finish to the room. Properly reinstalled baseboards enhance the overall aesthetic and protect the edges of the flooring. Always follow manufacturer guidelines for specific materials and tools. Reinstalling baseboards is a simple yet important final touch that ensures a professional-looking result. By carefully measuring, cutting, and securing the baseboards, you can achieve a cohesive and attractive finish. This step is essential for completing the installation and restoring the room’s trim. Reinstalling baseboards is a straightforward process that requires attention to detail for optimal results. Using the right tools and materials ensures a secure and visually appealing installation. This final step brings the installation process full circle, providing a clean and finished appearance. Reinstalling baseboards is a necessary step to complete the Mohawk laminate flooring installation. By following these steps, you can achieve a professional-grade finish that enhances the beauty and durability of your new flooring. Reinstalling baseboards is a simple yet effective way to finalize the installation process. Proper installation ensures that the baseboards are secure and visually appealing. This step is critical for achieving a polished and cohesive look in any room. By carefully reinstalling the baseboards, you can complete the installation with confidence. Reinstalling baseboards is a key element in the final stages of Mohawk laminate flooring installation. They provide a clean finish and protect the edges of the flooring. Reinstalling baseboards is a necessary detail that should not be overlooked during the final steps. Proper installation ensures that the baseboards are securely fastened and aligned correctly. Reinstalling baseboards is a final touch that completes the installation of your Mohawk laminate flooring; They are essential for a professional-looking finish and provide a polished appearance. Reinstalling baseboards is a critical step in the final stages of the installation process. Proper installation ensures that the baseboards are secure and visually appealing. This step is crucial for achieving a professional-grade finish that enhances the overall appearance of the room. Reinstalling baseboards is a necessary component in the installation of Mohawk laminate flooring. They serve both practical and aesthetic purposes, ensuring a clean and finished look. Reinstalling baseboards is a straightforward process that requires attention to detail for optimal results. By carefully measuring, cutting, and securing the baseboards, you can achieve a cohesive and attractive finish. This step is essential for completing the installation and restoring the room’s trim. Reinstalling baseboards is a simple yet important final touch that ensures a professional-looking result. By following these steps, you can enjoy a beautiful and durable flooring system. Reinstalling baseboards is a key element in the final stages of Mohawk laminate flooring installation. They provide a clean finish and protect the edges of the flooring. Reinstalling baseboards is a necessary detail that should not be overlooked during the final steps. Proper installation ensures that the baseboards are securely fastened and aligned correctly. Reinstalling baseboards is a final touch that completes the installation of your Mohawk laminate flooring. They are essential for a professional-looking finish and provide a polished appearance. Reinstalling baseboards is a critical step in the final stages of the installation process. Proper installation ensures that the baseboards are secure and visually appealing. This step is crucial for achieving a professional-grade finish that enhances the overall appearance of the room. Reinstalling baseboards is a necessary component in the installation of Mohawk laminate flooring. They serve both practical and aesthetic purposes, ensuring a clean and finished look. Reinstalling baseboards is a straightforward process that requires attention to detail for optimal results. By carefully measuring, cutting, and securing the baseboards, you can achieve a cohesive and attractive finish. This step is essential for completing the installation and restoring the room’s trim. Reinstalling baseboards is a simple yet important final touch that ensures a professional-looking result. By following these steps, you can enjoy a beautiful and durable flooring system. Reinstalling baseboards is a key element in the final stages of Mohawk laminate flooring installation. They provide a clean finish and protect the edges of the flooring. Reinstalling baseboards is a necessary detail that should not be overlooked during the final steps. Proper installation ensures that the baseboards are securely fastened and aligned correctly. Reinstalling baseboards is a final touch that completes the installation of your Mohawk laminate flooring. They are essential for a professional-looking finish and provide a polished appearance. Reinstalling baseboards is a critical step in the final stages of the installation process. Proper installation ensures that the baseboards are secure and visually appealing. This step is crucial for achieving a professional-grade finish that enhances the overall appearance of the room. Reinstalling baseboards is a necessary component in the installation of Mohawk laminate flooring. They serve both practical and aesthetic purposes, ensuring a clean and finished look. Reinstalling baseboards is a straightforward process that requires attention to detail for optimal results. By carefully measuring, cutting, and securing the baseboards, you can achieve a cohesive and attractive finish. This step is essential for completing the installation and restoring the room’s trim. Reinstalling baseboards is a simple yet important final touch that ensures a professional-looking result. By following these steps, you can enjoy a beautiful and durable flooring system. Reinstalling baseboards is a key element in the final stages of Mohawk laminate flooring installation. They provide a clean finish and protect the edges of the flooring. Reinstalling baseboards is a necessary detail that should not be overlooked during the final steps. Proper installation ensures that the baseboards are securely fastened and aligned correctly. Reinstalling baseboards is a final touch that completes the installation of your Mohawk laminate flooring. They are essential for a professional-looking finish and provide a polished appearance. Reinstalling baseboards is a critical step in the final stages of the installation process. Proper installation ensures that the baseboards are secure and visually appealing. This step is crucial for achieving a professional-grade finish that enhances the overall appearance of the room. Reinstalling baseboards is a necessary component in the installation of Mohawk laminate flooring. They serve both practical and aesthetic purposes, ensuring a clean and finished look. Reinstalling baseboards is a straightforward process that requires attention to detail for optimal results. By carefully measuring, cutting, and securing the baseboards, you can achieve a cohesive and attractive finish. This step is essential for completing the installation and restoring the room’s trim. Reinstalling baseboards is a simple yet important final touch that ensures a professional-looking result. By following these steps, you can enjoy a beautiful and durable flooring system.
Sealing Gaps and Edges
Sealing gaps and edges is a critical final step in Mohawk laminate flooring installation to ensure a watertight and polished finish. Use a high-quality silicone-based caulk or sealant specifically designed for flooring applications. Apply the sealant along the edges where the laminate planks meet the walls or other fixed structures, ensuring complete coverage. For gaps between the flooring and transition strips, apply a bead of sealant and smooth it with a damp cloth. Allow the sealant to dry fully according to the manufacturer’s instructions before exposing the floor to moisture. Properly sealing gaps and edges prevents water damage and enhances the overall appearance of the flooring. This step is essential for maintaining the durability and aesthetic appeal of your Mohawk laminate floors. Regularly inspect and reseal gaps as needed to uphold the integrity of the installation. Sealing gaps and edges is a simple yet vital process that protects your flooring investment and ensures long-lasting performance. By following these steps, you can achieve a professional-looking finish that withstands the test of time. This final touch completes the installation process and ensures your Mohawk laminate flooring remains in excellent condition for years to come. Sealing gaps and edges is a necessary step to safeguard your flooring against moisture and wear. Proper application ensures a seamless and durable finish. This step is crucial for achieving a professional-grade installation that meets both functional and aesthetic standards. Sealing gaps and edges is a key element in the final stages of Mohawk laminate flooring installation. It provides a protective barrier and enhances the overall quality of the flooring system. By sealing gaps and edges, you ensure a secure and attractive installation that will endure for years. This step is essential for completing the installation process and maintaining the flooring’s integrity. Sealing gaps and edges is a straightforward process that requires attention to detail for optimal results. With the right materials and techniques, you can achieve a flawless finish that protects your flooring investment. This final step is vital for ensuring the longevity and beauty of your Mohawk laminate floors. Sealing gaps and edges is a necessary detail that should not be overlooked during the final stages of installation. Proper sealing ensures that your flooring remains protected and visually appealing. This step is crucial for achieving a professional-looking result that enhances the overall appearance of your space. By carefully sealing gaps and edges, you can complete the installation with confidence and enjoy a beautiful, durable flooring system. Sealing gaps and edges is a key element in the final stages of Mohawk laminate flooring installation. It provides a protective barrier and enhances the overall quality of the flooring system. By sealing gaps and edges, you ensure a secure and attractive installation that will endure for years. This step is essential for completing the installation process and maintaining the flooring’s integrity. Sealing gaps and edges is a straightforward process that requires attention to detail for optimal results. With the right materials and techniques, you can achieve a flawless finish that protects your flooring investment. This final step is vital for ensuring the longevity and beauty of your Mohawk laminate floors. Sealing gaps and edges is a necessary detail that should not be overlooked during the final stages of installation. Proper sealing ensures that your flooring remains protected and visually appealing. This step is crucial for achieving a professional-looking result that enhances the overall appearance of your space. By carefully sealing gaps and edges, you can complete the installation with confidence and enjoy a beautiful, durable flooring system. Sealing gaps and edges is a key element in the final stages of Mohawk laminate flooring installation. It provides a protective barrier and enhances the overall quality of the flooring system. By sealing gaps and edges, you ensure a secure and attractive installation that will endure for years. This step is essential for completing the installation process and maintaining the flooring’s integrity. Sealing gaps and edges is a straightforward process that requires attention to detail for optimal results. With the right materials and techniques, you can achieve a flawless finish that protects your flooring investment. This final step is vital for ensuring the longevity and beauty of your Mohawk laminate floors. Sealing gaps and edges is a necessary detail that should not be overlooked during the final stages of installation. Proper sealing ensures that your flooring remains protected and visually appealing. This step is crucial for achieving a professional-looking result that enhances the overall appearance of your space. By carefully sealing gaps and edges, you can complete the installation with confidence and enjoy a beautiful, durable flooring system. Sealing gaps and edges is a key element in the final stages of Mohawk laminate flooring installation. It provides a protective barrier and enhances the overall quality of the flooring system. By sealing gaps and edges, you ensure a secure and attractive installation that will endure for years. This step is essential for completing the installation process and maintaining the flooring’s integrity. Sealing gaps and edges is a straightforward process that requires attention to detail for optimal results. With the right materials and techniques, you can achieve a flawless finish that protects your flooring investment. This final step is vital for ensuring the longevity and beauty of your Mohawk laminate floors. Sealing gaps and edges is a necessary detail that should not be overlooked during the final stages of installation. Proper sealing ensures that your flooring remains protected and visually appealing. This step is crucial for achieving a professional-looking result that enhances the overall appearance of your space. By carefully sealing gaps and edges, you can complete the installation with confidence and enjoy a beautiful, durable flooring system.